Showing posts with label Gluten-Free. Show all posts

Wednesday, October 20, 2021

Pumpkin Protein Smoothie Bowl

When I discovered the Smoothie Bowl locally at The Juice Bar, it was love at first bite! 

This is the first year for me to create a pumpkin version. It's pumpkiny, bananay and full of whole food goodness -including half an avocado- to satiate my hunger until a late lunch. And, this recipe fits into a Paleo or KETO. If you're strict, leave out the pitted date.

It's good even without my preferred protein enhancements from Ancient Nutrition! But why miss an opportunity to bless your body? 

A quick note about my protein choices. The Multi Collagen Protein earns a WOWZERS from me, because it mixes into beverages and recipes without a weird texture or grit. Basically, it dissolves which means it's easily absorbed into your gut to work its magic! Collagen is not vegan. However, I prefer a plant-based protein powder for the taste, which is why I choose Plant Protein+ Vegan Superfood Protein Powder. Try both for yourself. (if the code doesn't pop up, email me for a special code). While other flavors are available, vanilla is my go-to, because I can make it work with all kinds of fruits, coffee, and extracts!

Here it is, my first-ever...

PUMPKIN PROTEIN SMOOTHIE BOWL

Into a food processor or blender...

  • 3/4 to 1 cup Unsweetened "Milk" (your choice, I used almond)
  • 1/2 cup+ 100% Pumpkin Puree' (Libby's will do, not the pumpkin pie mix)
  • 1 small frozen Banana (or half of a large frozen banana)
  • 1/2 large Avocado (or whole small avocado or frozen chunks, healthy fat)
  • 1 pitted Date (added for depth of flavor sweetness)
  • 1 scoop Ancient Nutrition Multi Collagen Protein
  • 1 scoop Ancient Nutrition Plant Protein+ Powder
  • 1 tablespoon Pumpkin Spice (I make my own bc I like extra nutmeg)

Toppings...

You can totally use your own protein powder and your own cooked pumpkin! Now, Go Play with Your Food and let me know how it turned out!

"Sam"

Saturday, October 16, 2021

Crockpot Pumpkin Spice Trail Mix

Our family enjoys meals from the crockpot just about twice, each week. With a busy schedule and me being the primary menu planner and prepper, our slow cooker gets quite a workout from soups to beans, from meats to broths and even the occasional breakfast. Around the holidays, we love hot wassail, a hot beverage of apple cider, cinnamon, cloves, orange and pineapple juices!

Around 3pm when my tummy starts feeling empty, I typically open a pack of nuts or seeds or something whole food to fill that gnawing void until dinner. When I discovered I could "roast" trail mix in the crockpot, I knew it had to be part of my yearly 31 days of #PunkinChunkin! 

Trail mix is really about preference. What do you like in your mix? This is a basic "roasted" recipe. You may like different nuts or may want to add m&m's or raisins to your end result!

CROCKPOT PUMPKIN SPICE TRAIL MIX

Into the crockpot...

  • 2 1/2 cups Coarse Chopped Walnuts
  • 2/3 cup Raw Cashews (not already roasted and salted)
  • 1/2 cup Raw Pumpkin Seeds (not already roasted and salted)

Mix separately...

Save to stir-in after trail mix has cooled...


Directions...

  • Put all the nuts and seeds in crockpot
  • Separately, melt coconut oil and mix with the coconut sugar, spices, vanilla and stevia, THEN, pour over nuts and seeds. Mix until well coated
  • Turn crockpot to high
  • Set your timer to :30 minutes. <ding> Stir.
  • Reset your timer to :30 minutes. <ding> Stir, again. This time, observe with eyes and nose for the "roasted" color and smell. You don't want the nuts to scorch. 
  • Note: If you have an older crockpot, you may want to add :15 to :30 additional minutes, watching and smelling and stirring to prevent scorching
  • When the mix is to your desired color and "roast," spoon our turn onto parchment paper to cool. This will happen fairly quickly. The parchment will serve as a tool, later!
  • Once cooled, lift the sides of the parchment turning it into a "funnel" to pour the trail mix
    into a large bowl
  • Stir-in cranberries and chocolate chips until well coated and mixed

Eat by the handful or over yogurt! Store in airtight baggie or container. Remember, this is basic "roasted." Before you edit, decide if the ingredient can endure the heat of the crockpot or if the ingredient needs to be stirred-in after cooling. 
Also, this recipe is gluten-free and sugar-free, but easily adapted for your taste.
Why YES, I am working on a savory, spicy version! 
Now, GO PLAY WITH YOUR FOOD and let me know how it turned out!

"Sam"

Wednesday, October 6, 2021

Creamy Chicken & Wild Rice Soup with Pumpkin

The light yellow is the cubed pumpkin

In 2020, my friend Tracy was participating in #CROCKtober by preparing her family's
meals in the crockpot all October. As it would happen, Momma Mary and I had a hunger for wild rice and had cubed pumpkin and homemade chicken broth begging to be used which meant, I created a quick crockpot recipe for Tracy and our household.

Into the crockpot went easy ingredients and out came a savory, makes-the-world-right soup. BUT, this is a new year to change up that recipe...so, I made it creamy!


CREAMY CHICKEN & WILD RICE SOUP with PUMPKIN

Into the crockpot:

1-2 Onions, diced

Several Carrots, sliced like coins

1-2 Garlic cloves, minced

2-3 Celery ribs, diced

2-3 cups Pumpkin, cubed (or cook separately, see sidenote, below)

1-2 cups Wild Rice blend

10-12 cups Chicken or Vegetable Broth (easily edited to turkey broth after Thanksgiving)

2-3 cups Chicken (omit for vegan version or use turkey after Thanksgiving)

salt, pepper, red pepper flakes, fresh sage, fresh thyme

1-2 8 ozs blocks Cream Cheese (Miyoko's Creamery makes a wonderful vegan cream cheese found at our local Publix grocery store or online)

  • Place all ingredients in your crockpot -not the cream cheese which you'll save for just before serving- 
  • Turn to Medium for an all-day or overnight slow cook -or- shorten the cooking time by dialing up to High until all ingredients are cooked and the house smells yummy!
  • Just before serving, remove 2 cups of broth from your crockpot and ladel into your blender with the block(s) of cream cheese. Blend until smooth.
  • Pour the zipped-down cream cheese broth mixture into the crockpot and stir to incorporate.
  • Ladel into soup bowls and enjoy!

Here's a sidenote: If your family is not crazy about pumpkin, no worries. Either strike from the recipe -or- in a separate small pot, add the cubed pumpkin and your choice of broth just until covered and gently boil until soft. When the soup is ready to be served, spoon the cooked pumpkin into the bowl and ladel soup over it!

This recipe is good for your tummy and your soul, but don't take my word for it. Go Play with Your Food and let me know how it turned out...

"Sam"

Tuesday, October 5, 2021

Pumpkin Crumb Cake

It's hard to believe I can say I've made a recipe for "decades," but that's the case with Pumpkin Crunch. Every pumpkin season I look forward to this autumnal treat. However, after being diagnosed with Hashimoto's Thyroid Disease (a word I prefer not to use), I wondered if it could be made to be healthier and non-inflammatory. The answer is yes!

My friend, Jeanene, who is a Trim Healthy Mama Lifestyle Coach, sent me a recipe from one of her friends! It's really good as is, but as you may have read in previous recipes -- I play with my food and did an edit. If I were better adept at cooking without eggs, this could have easily been vegan. I kept the eggs in the recipe, but changed other ingredients and noted them below.

Even if thyroid issues aren't in your life, you'll appreciate this being a healthier, sugar-free, gluten-free version for your family that actually tastes great!

PUMPKIN CRUMB CAKE (or Pumpkin Crunch) for those who want to cut the sugar and gluten

Cake Bottom Filling Ingredients:

  • 3/4 cup Half and Half (I used Califia Pumpkin Spice Almond & Coconut Milk Creamer from the grocery store because it already had the spices and was a new product, this year)
  • 2 cups 100 % Pure Pumpkin (not the pie filling)
  • 3 large Eggs
  • 1 cup Monkfruit (I used Lakanto White)
  • 2 teaspoons Pumpkin Pie Spice
  • 2 pinches Mineral Salt
  • 1/2 teaspoon Xanthan Gum (don't be afraid of this stuff. it's a thickener that works like magic without adding to your glycemic index --meaning it won't raise your blood sugar like corn starch!)

Crumble/Crunch Topping Ingredients:

  • 1 cup Gluten-Free Baking Blend (I used Trim Healthy Mama, but others are available at the store)
  • 1 1/2 cups Chopped Pecans
  • 1 teaspoon Pumpkin Pie Spice (you can make your own)
  • 2 pinches Mineral Salt
  • 1/4 teaspoon Baking Powder
  • 3/4 cup Monkfruit (I used Lakanto Golden)
  • 1 stick of Melted Butter (Miyoko's Creamery Butter is a wonderful vegan substitute which would have made this recipe dairy-free)
Instructions:
  • Preheat oven to 350*
  • Grease 9x13 (or slightly smaller) casserole dish
  • Mix Bottom ingredients, together, and spread evenly in dish
  • Mix Topping ingredients, together, and sprinkle over the pumpkin bottom filling
  • Pour melted butter evenly over the topping
  • Bake 45 minutes to 1 hour until center is set and topping light brown
  • Enjoy!
These newer ingredients may seem intimidating, but they are not. They're simple substitutes for the others. Now, go play with your food and let me know how it turned out...

"Sam"

Monday, October 4, 2021

Pumpkin Pie Spice

Mixing up your own batch of PUMPKIN PIE SPICE is easy as ...well, as easy as pie. 

I reuse the container from years ago to store the mixed spices, because it’s already labeled! Too easy.

After you make a batch, then you can do all kinds of recipes with your homemade PS like a home-brewed PSL or an actual pumpkin pie!

What is pumpkin pie spice? 

It's a mixture of the following spices in increments that you prefer:

Ground Cinnamon
Ground Cloves
Ground Nutmeg (I prefer to grate my own from the whole nutmeg seed, available from McCorkmick in the spice and seasonings aisle at the grocery)
Ground Alspice
Optionally, Ground Ginger (my preference)

  • Start with 3 tablespoons of cinnamon. Then, mix it to your taste by adding in teaspoon measurements and tasting or smelling. Add more of the flavor, like cinnamon, if that’s what YOU like! I go a little heavy on the nutmeg, because it's my fave for the holidays! The way I like it is freshly microplaned! (Pictured)

My friend, Jani, showed me how her family enjoys crisp apples. She takes cinnamon and sliced apples, tosses together and chills! The only sweetness is from the apple! I decided this could be done, instead, using the homemade pumpkin pie spice — it works for me! 


Go Play with Your Food and let me know how it goes for you...

"Sam"


Sunday, October 3, 2021

Dessert Pumpkin Hummus

Savory & Dessert Pumpkin Hummus
I remember a number of years ago when I spotted a chocolate brownie dessert hummus at the grocery store. This foodie heart fell in love! 


If you're a pumpkin pie lover, you may fall in love with this pumpkiny, protein-packed, sugar-free goodness! Traditional hummus uses olive oil and tahini. This recipe uses peanut butter to serve as both!

It really takes a food processor or a fancy-schmancy blender to make hummus.


DESSERT PUMPKIN HUMMUS

1 15 oz can Chickpeas

1/2 cup creamy unsweetened Peanut Butter (I prefer Skippy No Sugar Added)

1/3 cup Maple Syrup (your choice, 100% or sugar-free)

1/3 cup 100% Pure Pumpkin (puree or pack - not pie filling)

1 teaspoon Vanilla Extract

2 teaspoons Pumpkin Pie Spice (make your own!)

pinch of salt

1/2 cup mini or regular dark chocolate chips (I prefer Lily's Dark Chocolate Chips)

opt. 1 scoop Vanilla Multi Collagen Protein (I prefer Ancient Nutrition)

  • Combine all ingredients except for the chocolate chips into the food processor
  • Pulse until smooth. You may need to scrape down the bowl occasionally 
  • Transfer to a different bowl or container to fold in the chocolate chips
  • Chill in air-tight container in the fridge until ready to serve with apple slices, vanilla wafers or graham crackers
That's it! Easy-chickpeasy! Go play with your food and let me know how it turned out...
"Sam"

Savory Pumpkin Hummus

Savory & Dessert Hummus 
If you love hummus and you love pumpkin, you may love Savory Pumpkin Hummus. This version uses Tony Chachere's Original Creole Seasoning for the salty kick and, then, an ice water technique to produce a creamy consistency without adding so much olive oil. I'm not a fan of tahini in traditional hummus ...it's truer to say that it doesn't like my tummy. I DO like the way this recipe turned out! You really need either a food processor or one of those fancy-schmancy blenders to make hummus.


SAVORY PUMPKIN HUMMUS

1 15 oz. can Chickpeas (a.k.a. garbanzo beans)

3/4 cup 100% Pure Pumpkin (a.k.a. puree or pack - not the pie filling)

opt. 2 tablespoons White Miso (white miso is milder or you could use tahini or omit, altogether)

2 tablespoons Olive Oil

6 tablespoons Ice Water

1 Garlic clove, minced

1 to 2 teaspoons Tony Chachere's Original Creole Seasoning

1/2 to 1 teaspoon Cumin

opt. 1/2 to 1 teaspoon Smoked Paprika (again, optional)

  • Drain and rinse chickpeas
  • In a food processor, add chickpeas, pumpkin, miso, olive oil and garlic
  • Pulse a few times to get it started and, then, let it rip, adding the ice water a tablespoon
    at a time. You may need to stop occasionally to scrape down the sides
  • Add in Tony Chachere's Original Creole Seasoning (we just call it Tony's), cumin and smoked paprika 
  • Blend until smooth and taste-- Does it need more of something? When you're confident of owning the flavor, spoon into air-tight container and chill until ready to serve with veggies, naan or crackers
Yep. It's that simple! Go play with your food! Let me know how it turned out...
"Sam"

Tuesday, May 20, 2014

2-on-Tuesday: Asparagus Quiche with Spaghetti Squash Crust

I know! I know! I had you at Asparagus Quiche right up until "Spaghetti Squash." Right?!
Admittedly, I adore all things pumpkin and squash. However, you may not. If you knew the caloric and nutritional difference between a traditional pie crust made with flour vs this crust made with spaghetti squash, you just may consider giving it a try! Also, because wheat was not used, this is a Gluten-Free offering! It's not that expensive nor difficult.

I picked up this recipe from Tasty Kitchen and decided to give it a try! It's a hit! Don't be intimidated by preparing either the asparagus or the spaghetti squash. I'll help ya with that!

Asparagus Quiche with Spaghetti Squash Crust

13 ozs or 1 bunch, Fresh Asparagus, stalks snapped & spears chopped 1"
1 small Vidalia Onion, chopped (I prefer sweet onions)
2 cloves, Garlic, minced
1 teaspoon, Olive Oil
5 Eggs
1 cup, Almond Milk (Use whatcha got!)
1 cup, Swiss Cheese, shredded
1/2 teaspoon Salt
1/4 teaspoon Pepper, freshly grated
3 cups, Spaghetti Squash, cooked and "raked"

  • Preheat oven to 400 degrees. 

To Prepare Spaghetti Squash: Cut squash lengthwise. Scoop out the seeds and stringy things. Place cut-side down on cookie sheet and bake for 40 minutes to 1 hour, until fork tender. (For simpler clean-up, I cook my squash either on parchment or a Silpat.) Allow cooked squash halves to cool enough to handle. Holding one of the halves of squash in one hand, use a dinner fork with the other hand to "rake" the squash. As you "rake," the squash will begin to release into what appears as "spaghetti!" 

To Prepare Fresh Asparagus: (Click here!) 

  • Chop onion & mince garlic.
  • Cut the snapped asparagus spears into 1" bite-size pieces.
  • Heat olive oil in a pan over medium heat. Sauté onion and garlic for several minutes until the onion is just soft. Add asparagus and continue to sauté until asparagus has turned a bright green and is soft, but not limp and mushy.
  • While the above is sautéing, grease a pie pan and press the spaghetti squash to the sides and bottom of the pan forming an even crust. You may have squash left-over. No problem!
  • Whisk together eggs, milk, cheese and S&P and pour into the newly formed crust.
  • Spoon the sautéd veggies, evenly into the egg mixture making sure veggies sink in.

Note: My pie pan was shallow and could not hold the entire recipe. No problem! I pressed the remaining squash into a smaller oven-safe pan (actually, it was my small cast iron skillet), whisked another egg into the remaining egg mixture and saved back and spooned-in some of the veggies for this second mini-quiche. It was adorable! I loved the texture the cast iron gave the crust!

  • Bake for 40 minutes OR until quiche is firm (not jiggly) in the center!
My hubby was in the mood for spicy and suggested it have a few splashes of Sriracha, next time! This dish is great for breakfast, brunch, lunch or dinner...or a quick hit of protein after a strenuous workout! Also, it travels well!

It's time for you to go #playwithyourfood!

Tuesday, March 4, 2014

2-on-Tuesday: Bean and Mushroom Chili

Unsweetened Cocoa Powder.
What?
Yes, in chili! As it turns out, cocoa powder is a classic ingredient in Mexican cuisine. Nah, the chili doesn't taste like chocolate. Instead, it takes on an earthy, dark flavor which could be brightened with fennel...if I liked fennel...which I don't...but you might. ;)

Bean and Mushroom Chili
(Forks Over Knives, page 129)

1 large onion, peeled and diced
1 lb button mushrooms, chopped (I used Baby Portabella mushrooms.)
6 cloves Garlic, peeled and minced
1 tablespoon Ground Cumin
1 tablespoon Chile Powder
1/2 teaspoon Cayenne Pepper (I used habañero sauce.)
1 tablespoon Hershey's Unsweet Cocoa Powder
1 (28 oz) can Diced Tomatoes
2 (15 oz) cans Pinto Beans, drained and rinsed
2 cups Water
Salt, to taste
**optional: dollop of plain Greek yogurt & shredded sharp cheddar
  • Sauté onion and mushrooms in a large pot over medium heat for 10-15 minutes. Use 1-2 tablespoons of water to keep the veggies from sticking OR, if you're crunched for time, use a splash of olive oil or coconut oil to sauté the veggies.
  • Add garlic, cumin, chile powder, cayenne and cocoa and cook for 3 minutes.
  • Add tomatoes, beans and water and simmer, covered for 25 minutes.
TIP:
*Never wash mushrooms. Brush or wipe to clean mushrooms.

Curl up on the couch with a snuggly blanket and a deep bowl of this chili on a cold, rainy night. Mmmm. Toasty inside and out!


Tuesday, February 18, 2014

2-on-Tuesday: White Bean Chili with Jalapeno and Lime

OH MY STARS!

My taste buds want to sing whenever Tex-Mex flavors embrace one another for that oh so wonderful combination! In this Forks Over Knives recipe, fresh limes and jalapeños are the dancing partners adding brightness to this vegan chili!

Wait...I see. You're a little scared of jalapeños. Don't be. Remove the membrane and seeds to cool off the heat, but jazzing the chili with great flavor! 

White Bean Chili with Jalapeño and Lime
(The Forks Over Knives Cookbook, page 130)

1 large Yellow Onion, peeled and diced
1 large Bell Pepper, seeded and diced (I had an orange pepper on-hand.)
3 Jalapeño Peppers, membrane and seeds removed and chopped finely
6 Garlic cloves, peeled and minced
2 tablespoons Ground Cumin
1 (28 oz) can Petite Diced Tomatoes (Do not drain)
2 (15 oz) cans Navy Beans, drained and rinsed
3 cups Vegetable Broth
Zest & Juice of 2-3 Limes 
1 cup Cilantro, chopped (I love this stuff and add double!)
Salt, to taste
**optional: Plain Greek yogurt & shredded cheddar cheese as toppings

  • Sauté onion, bell and jalapeño peppers in large pot over medium heat for 7 minutes.
    If you have time, use the dry sauté method to reduce fat by using only a couple of tablespoons of water to keep the veggies from sticking. If you're in a hurry, use less than 1 tablespoon of olive or coconut oil to sauté the veggies.
  • Add garlic and cumin and cook for 2-3 more minutes.
  • Add the tomatoes, rinsed beans and veggie broth and bring to boil over hight heat.
  • Reduce heat to medium and cook, covered, for 25 minutes.
  • Add lime zest and juice and cilantro!

Need a little more kick? Add another jalapeño or a couple of splashes of habañero sauce! Now, we're talking!

Tuesday, January 28, 2014

2-on-Tuesday: Crustless Spinach Quinoa Quiche Cups

Perusing all of the social media fronts, I came across this handy recipe posted by a friend! By handy, I mean, it is one of those snatch-and-run meals packed full of goodness to keep you powered until the next break or meal! OR, enjoy it with a side salad and raw carrots for an enviable lunch at the office!

Crustless Spinach Quinoa Quiche Cups

1/2 - 3/4cup Quinoa, cooked (I've used the off-white and tri-color varieties)
4 Whole Eggs, beaten
1 - 2 fistfuls of Baby Spinach, chopped with any tough stems removed
1 Leek, white and some of the green thinly sliced
1 - 2 tablespoons Your Fave Fresh Herb (suggestions: Oregano, Rosemary, etc.)
5 - 6 ozs Goat Cheese, softened (a.k.a. Chevre. Or, choose cream cheese)
S&P, to taste
*optional: red pepper flakes, sriracha, garlic, 1 teaspoon baking powder

  • Remember to rinse and slightly massage quinoa in cold water to remove the bitter, outer seed case layer. In some people, this bitter layer may cause intestinal discomfort. Quinoa is a protein-packed super grain, which has a faint nutty flavor and absorbs the flavors it is cooked with. Tip: I cook quinoa in my rice cooker. Quinoa doubles when it is cooked.

  • While quinoa is cooking, prep and sauté the leek. To prep the leek, slice-off the root end and
    most of the tall green blades and discard. Cut lengthwise and run water over each half, fanning the layers to wash out any dirt. Thinly slice and sauté in just a splash of olive oil or coconut oil.

  • Preheat oven to 350 degrees. Prep muffin tin. I prefer to use my mammoth muffin tin lined with parchment. Tip: I've tried coating the cups with Baker's Joy...it did not work well.

  • In large bowl, beat eggs and smoosh-in goat cheese, stir-in spinach, cooked quinoa, herbs, sautéd leeks and seasonings. Divide the mixture between 10 regular or 5 mammoth muffin cups. 

  • Bake 15-20 minutes for regular muffin tin or 30-35 mammoth muffin tin...until the center is set. Make sure the spinach does not burn. Tip: I laid a sheet of foil loosely on top to trap any steam
    and prevent the spinach from burning.

I have a little friend who wanted to know if only egg whites could be used. SURE! My suggestion to her was to add an additional egg white and 1 teaspoon of baking powder to hold the loft!

Tuesday, December 24, 2013

2-on-Tuesday: Homemade Fruit & Nut Bars

Recently while online searching for healthy ideas and treats, I saw a recipe post for Fruit & Nut Bars from FitSugar.com similar to the popular Larabar. With my pursuit of fitness and healthy nutrition crossing the one year mark, this grabbed my attention.
You CANNOT make this recipe without some sort of kitchen food processor. The base of the recipe can be built on and changed up to suit your fancy! So, get to it and #playwithyourfood!

3 Ingredient Fruit & Nut Bars

10 Pitted Dates (I used Medjool Dates)
1/4 cup dried Cranberries
1 cup "raw" Almonds (always raw nuts not dry, roasted)
**Optional: Hershey's Cocoa Powder or Ground Spices
  • Secure lid and hang on to your processor. Process all three ingredients for about 2 minutes!
  • The mixture will have bits of nuts, but the fruit will be combined.
  • It's at this point, you can add ground spices or --my fave-- Hershey's Cocoa Powder and pulse a couple of times to incorporate.
  • Pour mixture onto a sheet of plastic wrap and begin kneading. Form into a 1/4" thick rectangle approximately 7" long, which will be sliced into bars, later. Mixture will quickly come (press) together inside the plastic wrap.
  • Once shaped, keep wrapped in plastic wrap and place in fridge until firm.
  • Slice into bars and store in fridge for a chewier texture!
Continue playing with the recipe choosing different ingredients...
  1. Keeping the dates, but substituting dried Apricots (instead of cranberries) and raw Cashews for thealmonds, process. 
  2. Once the mixture has been kneaded and formed, press sunflower seeds into the top, re-wrap and place in fridge until firm!
  3. TRY dried pineapple and coconut with raw nuts like pistachio or macadamia for an island flavor!
  4. OR, instead of bars -- pinch off enough to roll into balls for a quick pop-in-your-mouth sweet & healthy fix!
Let your creative juices flow to concoct what sounds good to you! There are no rules! 

Tuesday, August 27, 2013

2-on-Tuesday: Lotsa Vegetable Chowder

The simmering pot of chowder has my home smelling incredible!
The corn cobs are cooling.
The flavors are marrying.
I can't wait for dinner!

Even though this will be a hot week, I know the promise of autumn is around the corner! College football starts, this week!

But, for tonight, I'll pretend the weather is turning crisp and settle in with a big bowl of...

LOTSA VEGETABLE CHOWDER
(pg 94; Forks Over Knives)

6 cups Water (I used 8 cups)
2-3 lbs Potatoes (I had red skin new potatoes)
1 medium to large Onion, peeled and chopped
6 ears Fresh Corn, kernels removed; cobs reserved
2 medium Carrots, peeled and diced
2 stalks Celery, chopped
1 medium Red Bell Pepper
2 cups Broccoli & Cauliflower
2 cloves Garlic, peeled and minced
2 tablespoons Thyme, chopped
1 teaspoon Pepper (I used freshly ground from my pepper mill)
2+ teaspoons Ground Cumin
1 tablespoon Dill, chopped
Salt, to taste (save this until the end)

  • In large pot, combine all of the above ingredients including the corn cobs. Do not add salt until the final simmer.
  • Bring to a boil over high heat. Reduce the heat to medium-low and simmer for 30 minutes or until the vegetables are tender.
  • Remove corn cobs and let cool.
  • Directions call for only 1 cup of soup to be removed and pureed. I pureed 4 cups because I like my chowder thicker! To do this, pour the desired number of cups of
    soup into the blender with a tight-fitting lid, cover with a towel and blend away!
  • Return the purreed soup to the pot.
  • Scrape corn cobs with back of a knife to remove the creamy corn bits from the kernels and add the bits to the pot.
  • Stir and season with salt.


Mmmm! Perfect! Oooooh, this is definitely a keeper! And, with so much, I can freeze some for this fall and winter OR pack up a jar for our son to enjoy at his new home!

~"Sam"

Tuesday, June 11, 2013

2-on-Tuesday: Portobello Mushroom Tacos

Isn't it great when family jumps-in to help make dinner? I love for my honey to strut hisculinary stuff which tends to happen more often in the summer and early fall grilling months! This is another plant-based food offering from Forks Over Knives  ...courtesy of my honey and me.


Portobello Mushroom Tacos

1 package Corn Tortillas (corn are less fattening than the flour tortillas)
Grilled Portobello Mushrooms (I figured 2 caps per person)
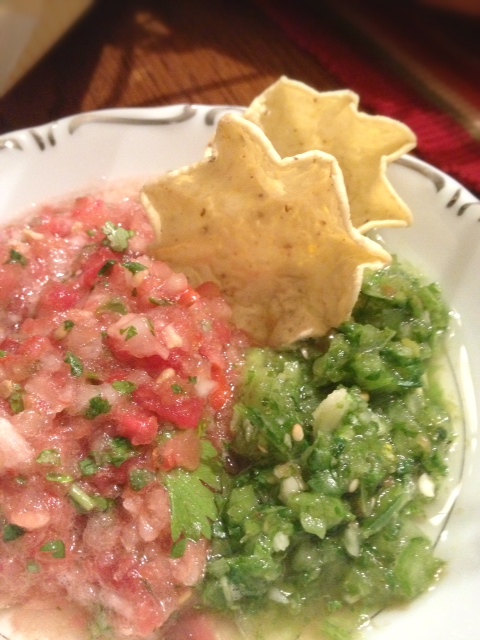
Salsa Verde
Homemade Salsa
Shredded Romaine Lettuce

  • Marinate the mushrooms 1 hour or overnight in fridge - optional. We used a low-sodium marinade. 
  • While mushrooms are grilling (3-5 minutes each side), heat tortillas  on a dry, nonstick skillet over medium to medium-high heat, turning until soft.
  • To serve, put a few mushroom slices on tortilla and top with either Salsa Verde or a salsa of your choice and some crunchy, shredded Romaine.


Salsa Verde (Green Sauce)

1 pound Tomatillos, husks removed, coarsely chopped
1 Jalapeno, chopped (we use the seeds for a hotter flavor)
6 Green Onions (white & green parts), chopped
2 cups Cilantro, leaves and tender stems chopped
4 cloves Garlic, peeled and chopped
2 Limes, zest and juice
Salt, to taste

  • If you have a food processor, simply coarse-cut the tomatillos, onions, jalapeno and garlic into large chunks, toss into processor and zip-down with lime juice and zest! Otherwise, get to choppin'!


Salsa
(Terry makes the salsa. Salsa is salsa. You add what you like!)

4-5 Tomatoes (large, ripe, deep red), chunked
1 Onion, chunked
4 cloves Garlic, peeled and halved
1 Jalapeno, chunked (we use the seeds for a hotter flavor)
1 fistful Cilantro - optional
1 Lime, juice
Salt, to taste

  • Again, we use a food processor! We have used a blender in the early days to make smaller batches.

You will absolutely love the fresh flavors YOU create! So good! My honey got extra kisses for his salsa ... which we served, also, with baked tortilla chips!

Tuesday, April 2, 2013

2-on-Tuesday: HummNooch!

The Saffron Jasmine Rice was from my #FoodiePenPal
When I decided to make better choices by eating plant-based nutrition, I stuck with the usuals that meat-eaters tend to easily think of;  beans, salads, beans, fruit. Not fun and gets boring fast. I'm glad to live in the age of technology where researching new and fun plant-based menus for myself and the family is easy!

One such recipe involved something called "HummNooch." I noticed many vegans and vegetarians referred to this new-to-me ingredient. I just figured it must be an exotic spice that really didn't sound appetizing. Boy, was I wrong! By far, my fave of the online versions is from Heather of For the Love of Kale. But, I can't leave it alone, I just have to play with my food!


HummNooch or Hum-Nooch is really two different ingredients combined to make a sauce. "Hum" is short for hummus and "nooch" is the clever first syllable sound of Nutritional Yeast. Hummus + Nutritional Yeast = HummNooch. I understand this really isn't a great definition because it's leading to another question: What is Nutritional Yeast? Yep, I asked the same question and found the best answer and how to cook using it with Susan of Fat Free Vegan Kitchen.


Don't be skeered! If you are looking to add some spice and jazz up your nutritional palate, try my take on -  


Humm-Nooch...with roasted stuff


Roasted Stuff: 

(Your choices, I haven't found rules in plant-based cooking)

Potato (Sweet, Red Skin or Blue) diced bigger (I prefer the Sweet)

Parsnips (they are akin to a sweet, white carrot)
Extra-Firm Tofu, 1 block - drained & diced bigger
Olive Oil or Coconut Oil

Total of any combination of above diced items: 3 cups-ish

Humm-Nooch Sauce:


6 tablespoons     Hummus (purchased or make your own)

3-4 tablespoons Nutritional Yeast (I use Bragg)
1 tablespoon       Olive Oil or Coconut Oil
1/2 cup                 Soy Milk (I prefer Light Vanilla, it works for me!)
1 tablespoon       Masala (a spicy, dry Indian spice blend. "Garam Masala")

  • Heat oven 400 degrees while prepping food.
  • First, drain your block of tofu by wrapping the block in paper towels or napkins; sandwiching the wrapped block between two plates or pie pans; weighting down the top plate with a heavy item, pot or brick (I use my tea kettle filled with water). The idea is to squeeze out the moisture in the tofu. This usually takes 20-30 minutes.
  • Cut your choice of veggie(s) to be roasted into larger diced pieces.
  • Toss all items to be roasted (veggies & tofu) with a little oil (I prefer coconut oil to a spray oil in this recipe) and spread out on a large cookie sheet. 
  • Bake or Roast for up to an hour until root veggies are fork-tender.

While the above items are roasting, heat all of the HummNooch Sauce ingredients together. This step doesn't take long. When roasted stuff is ready, combine everything and serve over a bed of rice!

For additional nutrition: Stir and cook down a fistful of kale into the HummNooch Sauce -OR- add shredded/flaked coconut.

TIP: If you have a meat-eater who absolutely refuses to try tofu, substitute cooked & diced chicken breast for their serving.

Any questions? It sounds involving, but I whip this dish up in a hurry!