Showing posts with label Dessert. Show all posts

Thursday, March 23, 2017

RECIPE: Easy Almond Cake with Duck Eggs

This recipe came from my momma who found it somewhere. She knows I love most all things almond. When I spotted this recipe loosely lodged between others on my cookbook stand, I knew it came from her! Making the almond cake doubly good were the two duck eggs from my neighbor's lucky ducks! The spring weather has warmed and ducks want to lay eggs!

The batter is slightly thick, but bakes light-as-air and thin with a light crispy top. A pleasant snack for when you're in the mood for exquisite almond flavor without the heaviness of frosting, cream or syrup.

Almond Cake

1 stick of Butter, because buttah makes it bettah
2 Eggs (duck or chicken)
1 cup All-Purpose Flour
1 cup Sugar
2 teaspoons Almond Extract
Duck eggs are creamier like farm
fresh chicken eggs. The shell
is thicker and the taste is rich.
2-4 Tablespoons Sliced Almonds (sliced, not slivers)

  • Preheat oven 325*
  • Melt butter in microwave just until liquified (If too hot, let cool. Overly hot butter will cook eggs. Not good.)
  • Beat eggs into melted -but not hot- butter
  • Add flour, sugar and almond extract and mix
  • Pour and spread into 8" or 9" cake or pie pan which has been lightly sprayed with Baker's Joy.
  • Sprinkle almond slices on top. (I don't use almond slivers because they remind me of clipped toenails!)
  • Bake 35-45 minutes or until knife or toothpick inserted comes out clean. Don't overcook, because the bottom will be too done.
  • Let cool a few minutes before serving! Mmmmm!
Visit your local Farmer's Market to see if there are duck eggs for sale! You'll appreciate the quality and the American Farmer will appreciate your patronage! Go Play with Your Food!

Tuesday, July 19, 2016

Tuesday Recipe: Just Peachy

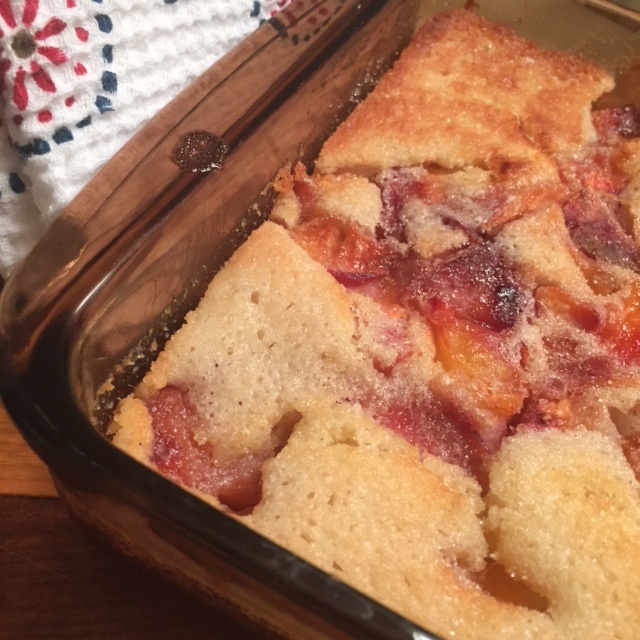
Summer time means fresh produce at the peak of their sun-ripened season! We have a fave place to get sweet, juicy peaches -- Georgia! To be exact, Exit 142 off I-75 is a little peachy heaven called LANE SOUTHERN ORCHARD where one can enjoy everything peachy from pies, ice cream, and syrups to soap! This is where you can purchase a small bag of peaches or a half bushel. If you buy the big box, you'll want to savor the flavor well into winter, as well as slurping the deliciousness, now!


Peeling is up to you! If you choose to make a cobbler, don't be too hasty to discard the fuzzy peel. If you're canning for peach jam or preserves, you may want to peel the peaches. Defer to your recipe on that one; however, I understand there is actually a Peach Peel Jelly! Hmmm. Peaches may be sliced and frozen!


Let's say you choose to peel your peaches. Toss those peels and pits into a pot with enough water to cover everything, (consider a 1:1 ratio, for each cup of peach slices and peelings, add a cup of water) bring to a slow and long simmer to bring out the sweet goodness to make PEACH NECTAR. Add some sugar or honey and a splash of lemon juice. 


After the  peels and pits have rendered a pulpy nectar, remove pits, allow to pulp to cool, process in blender or processor until smooth. Use a towel on top of blender for protection. Pour into containers to freeze, leaving enough space in jar or container for expansion in the freezer. Nectar can be thawed, later, to add to recipes or over ice cream or pancakes or added to smoothies, etc.


PEACH COBBLER (simple, not super sweet) 

1 cup Self-Rising Flour
1 cup Sugar
1 cup Milk (or your fave "milk" - almond, coconut, soy)
2 cups Peaches, sliced or chunked
1/2 cup Butter


  • Melt butter in 9x13 casserole dish in 350* in preheated oven (or while it's preheating).
  • In separate bowl, mix together self-rising flour, sugar and milk.
  • Pour into melted butter in the baking dish, stirring around.
  • Spoon peaches with the syrup they've made, evenly into the batter. Sprinkle with sugar or turbinado for a little "extra love."
  • Bake 350* for 30-45 minutes. 
  • Let cool -just a little- before serving!

Let me know how yours turn out! Now, git in there and play with your food!

Tuesday, March 15, 2016

Budino

Don't think healthy = Dessert? Think, again!

This is a BUDINO (boo-deen-oh). --->

It's like a weird looking pudding. But, looks can be deceiving. This budino is sweet and loaded with powerful chia seeds and protein! I had my first budino at LYFE Kitchen in Memphis, Tennessee. The flavor and texture were delightfully unique and vegan, so I decided to make it at home! 


Pictured are two different budinos in process: Banana Coconut Budino made with lite coconut milk and my spin on the recipe using the new offering from Naked® Nutmilk, which comes in Peachy Almond and Berry Almond, both of which are Non-GMO verified and responsibly harvested and packaged!


Budino

1 can of Coconut Milk -OR- 1 container of Naked® Nutmilk
1/3 cup of Chia Seeds (add more or less to suit your desired texture, next time)
2 Tablespoons Agave or Honey (my opinion is Naked® doesn't need it)
optional: 1-2 Tablespoons Unsweetened Coconut flakes

  • Mix the above ingredients
  • Place in airtight (lidded) container in fridge overnight. The next day, the chia should have gelled the mixture into the pudding or budino! 
  • Garnish with complimentary fruit and nuts and spices!
Let your creative juices flow with taste combos! Let me know how your budino turned out!

Go #playwithyourfood!

Saturday, July 5, 2014

Crustless Coconut Pie

For Mother's Day, I needed a coconut pie recipe and found a delicious one posted as "Mother's Day Pie" on allrecipes.com by Jo Pelletier. It was a lovely hit! 

As we all know, I have to play with my food, and felt inspired to make slight changes. The result was an exquisitely rich dessert to leave you moaning with delight and asking for another slice...if you're a coconut lover. If not, I'm sad for you.

Crustless Coconut Pie

1 cup Granulated Sugar
2 tablespoons All-Purpose Flour (try the Gluten-Free Baking Mix)
1/4 teaspoon Salt
3 tablespoons Butter, melted
3 tablespoons Coconut Oil (This is usually in white, solid form until melted)
1 teaspoon Vanilla Extract
4 Eggs
5 oz can Evaporated Milk (not sweetened condensed milk)
7 oz Coco Lopez Cream of Coconut (usually found in the baking aisle. If you cannot find it, go with all 12 oz of Evaporated Milk)
1 1/2 cups shredded Coconut (sweetened or unsweetened)

  • Preheat oven to 325 degrees.
  • Grease and flour a 9 inch pie plate.
  • In large bowl, mix together sugar, flour and salt.
  • Melt until "just melted" the butter & coconut oil, together. (You don't want this too boiling-hot for when you add the eggs. We don't want scrambled eggs in our coconut pie.
  • Stir with vanilla extract into flour mixture.
  • Then, add eggs one at a time, mixing well after each.
  • Mix in the evaporated milk and Coco Lopez.
  • Stir in shredded coconut and pour into prepared pie plate. (I try to guard against a possible spill-over during baking by placing the pie plate on a cookie sheet lined with parchment or my Silpat.) This pie rises while baking and, then, settles.
  • Bake in preheated oven for 35-40 minutes...or until the center has baked firm. How do you know if it's firm? Give it a jiggle!
  • Before slicing, allow to cool for 20-30 minutes.

You could refrigerate before serving, but I absolutely adore a warm coconut pie! I can imagine drizzling this with dark chocolate. What do you think? Also, I suppose a Gluten-Free Baking Mix could be substituted for the All-Purpose Flour, then, this recipe could be enjoyed by those who need a sweet fix!

Thursday, December 19, 2013

2-on-Tuesday: White Chocolate - Candy Cane Truffles

Why, YES, I do want to dazzle guests with my culinary skills! Even if you do notknow how to turn the oven on, you'll look amazing presenting these on the dessert table or as gifts!

I picked up the recipe on Pinterest from YourCupofCake.com and assembled the ingredients. Used my stand mixer for the truffle fudge and just left it in the same bowl. Sealed the top of the bowl with plastic wrap and left overnight in the fridge until I was ready.

I used my indispensable Christmas Kitchen Tool #25 (aka my hammer) to crush the candy canes inside a freezer zippered baggie!

When I was ready, I scooped the truffle fudge out, rolled into cute little one to two inch-ish balls and quickly rolled in the crushed candy canes. To top it all off, the dazzling little truffle went into mini holiday paper cupcake liners.

Really, there's nothing to it! Here's the recipe...


White Chocolate - Candy Cane Truffles

4 oz.         Cream Cheese, softened
1 cup        Powdered Sugar
1  1/4 cup White Chocolate Chips, melted (Hershey's Premiere White)
1/2 tsp      Peppermint Extract
1/3 cup     Candy Canes, crushed
  • Beat cream cheese and powdered sugar until smooth.
  • Melt white chocolate chips in the microwave, just until the chips begin to melt and give them a good stir to complete the melting. You do not want to scorch the chips!
  • Add melted chips and peppermint extract to cream cheese mixture beating until smooth and creamy!
  • Cover and refrigerate. (As soon as it is cooled and set, you could start a'rollin, but I waited until I had the time the next day!)
  • Use a mini ice cream scoop for ease and consistency for your truffles. Then, roll it in between your hands into a smooth ball. 
  • Roll around in a bowl of crushed candy canes!

Tips:
**After I made a batch, I stuck 'em back in the fridge until serving time. 
**The website suggests: Roll in candy canes the day you plan to serve them. Or else the candy layer will get sticky from absorbing the moisture in the chocolate.

OK! Go be dazzling!

Tuesday, November 6, 2012

2-on-Tuesday: Coffee Bean Crack!

Sifle, a boy in the Calcutta Blind School,
is pictured on the front of the bag
of our Do Good Blend
Several years ago, I looked for easy recipes that were quick and portable to be served to the evangelists, band, AV teams, Crunk Crew, reps and Tennessee missionaries when every restaurant in the locale was full of youth groups after the evening service of the Tennessee Youth Convention.

One of the easiest recipes is Coffee Bean Crack. To be honest I never knew what to call it until recently when someone at a church function returned to the bowl asking to take another hit!


Coffee Bean Crack
(Candy for Adults)

1 bag each of Hershey's Chocolate Chips (mix or match to your taste Premiere White, Semi-Sweet, Special Dark, Milk Chocolate. My fave is the dark & milk mix!)
1 Tablespoon Crisco Shortening (this keeps the choco shiny & smooth)
Do Good Coffee Whole Beans or ground by Land of a Thousand Hills Coffee Co.
**optional: 1-2 tablespoons or sleeve of dry, instant coffee
  • Empty 2-3 bags of Hershey's Chocolate Chips into a microwave-safe bowl
  • Add Crisco
  • Heat chips and shortening until just starting to warm-up. Stir.
  • Take your time. Back into microwave for small batches of time until the chips melt even as you stir them. Suggestion: Microwave for 30 seconds. Stir. 30 seconds. Stir. 30 seconds. Stir. Repeat until just melting. (It's at this time I would stir-in the dry instant coffee.)
  • Pour melted chocolate into cookie sheet lined with foil or baking parchment and spread.
  • Rap the cookie sheet on the cabinet to work out any bubbles hiding in the melted chocolate.
  • Take handfuls of Do Good Coffee Whole Beans (and/or ground) and sprinkle across the top of melted chocolate, rap onto the counter a few more times and let set or pop into the fridge for a quicker set.
  • When hardened break the Coffee Bean Crack into small shards and keep in a tin or airtight container.
Tips: 
  • The Premier White chips take longer to melt than the other chips. 
  • My old microwave was almost 30 years old and took 7 minutes for popcorn. I'm guessing yours will melt much faster, so really watch those chips. It can burn quickly and seize up, ruining the batch. 
  • If you're really patient, melt the chips over a double boiler. Just remember that any water droplets accidentally falling into the chocolate will cause the mixture to seize ruining the whole batch.
This is so easy to whip up when all of those holiday parties begin to stack up in the calendar!

Land of a Thousand Hills Coffee Co. (whole or ground beans) is the official roaster for Calcutta Mercy Ministries and is available in 3 different roasts - Do Good Blend, Kira Ikawa & Ruli Mountain. Coffee may be purchased from me at $15 per bag or online... Click here. The proceeds from each bag will feed 40 people in Calcutta/Kolkata, India!

~"Sam"

Tuesday, October 23, 2012

2-on-Tuesday: Pumpkin-Butterscotch Fudge

Don't even snarl your nose or stick out your tongue!  This recipe uses Libby's 100% Pure Pumpkin Pack (in a can), but the flavor that comes through is the buttery taste of butterscotch! Mmmmm! 

Pumpkin-Butterscotch Fudge

3 cups Sugar
3/4 cup Butter
1 5 oz can or 2/3 cup Evaporated Milk (NOT Sweetened Condensed Milk)
1/2 cup Solid Pack Pumpkin
1 teaspoon Pumpkin Pie Spice
1 12 oz pkg Butterscotch Morsels
1 7 oz jar Marshmallow Creme
1 teaspoon 
**(optional) 1 cup Pecans, chopped and toasted
  • In heavy saucepan combine sugar, butter, milk, pumpkin and spice
  • Bring to boil, stirring constantly to 234-240 degrees on candy thermometer. May take 10-ish minutes for proper consistent
  • Remove from heat, stir in butterscotch morsels, marshmallow creme, nuts and vanilla
  • Mix well
  • Pour into 9x13 baking dish, spread evenly and allow to cool before cutting

Tuesday, October 9, 2012

2-on-Tuesday: Pumpkin Crunch

It's PUMPKIN MONTH! If you love all things pumpkiny, this is a #pumpkinchunkin must-try for you!

PUMPKIN CRUNCH

1 pkg Yellow Cake Mix

1 16 oz can Solid Pack Pumpkin
1 12 oz can Evaporated Milk (NOT Sweetened Condensed Milk)
3-4 Eggs, beaten
1 1/2 cups Sugar or 1 cup Monk Fruit Sugar
4 teaspoons Pumpkin Pie Spice (or to taste)
1/2 teaspoons Salt
1 cup Pecans, chopped
1 cup Unsalted Butter, melted
  • Preheat oven to 350 degrees
  • Combine pumpkin, milk, eggs, sugar, spice and salt and pour into 9x13 baking dish
  • Sprinkle dry cake mix evenly over pumpkin mixture
  • Top with pecans
  • Drizzle melted butter over entire mixture
  • Bake for 50-60 minutes until golden brown and not jiggly in the center
Super easy, this recipe is like a mouthful of autumn! Enjoy! 

Wednesday, July 11, 2012

2-on-Tuesday: Magical Peanut Butter Cookies

Nope. I did not come up with this recipe. I think I saw it on a Paula Deen show, years ago. Regardless, it's a pretty good recipe using Splenda in the place of flour and sugar. That's right! Because there is no flour and the sugar comes comes from a sweetener (a smidge from the peanut butter), it's a great recipe for diabetics, too!


1 C  Peanut Butter (or your favorite nut butter)
1 C  Splenda or Stevia
**carefully smoosh the above ingredients together, then, add...
1    Egg
1 t  Vanilla
**and mix

  • Take batter and roll into 2" balls onto parchment paper lining your cookie sheet.
  • What would a peanut butter cookie be without the crisscross fork pattern? An unrecognizable cookie, that's what! Be sure to dip the tines of your fork into the Splenda before pressing the cookie.
  • Bake 350 degrees  for 15-18 minutes
Whatcha think?

~"Sam"

Friday, November 11, 2011

"Shoo-Fly" Pie

There is as much debate as wrinkled noses over the name. This pie is more like a spice cake in a crust than any of the traditional American pies we're accustomed to devouring. After a pilgrimage to his home in Pennsylvania Dutch country, my friend, Hershey, permitted me to sample a slice of his coveted taste-of-nostaglia with the funny name. Later, I surprised him with my offering, which he deemed a "Wet-Bottom Shoo-Fly" Pie. 


"Shoo-Fly" Pie (with a damp zone)


Liquid:
1/2 Tablespoon Soda dissolved in 3/4 cup boiling water
1/2 cup Molasses (Brer Rabbit yellow label)
1 Egg Yolk, beaten well


*Temper yolk with the hot soda water-molasses mixture so that the eggs don't scramble. If this is your first time to temper, message me for easy instructions.


Crumbs:
3/4 cup All-Purpose Flour
1/2 t Cinnamon
1/8 t each of Nutmeg, Ginger, Cloves
1/2 cup Brown Sugar
2 Tablespoons Shortening
1/2 t Salt


*Combine dry ingredients with shortening using hands to work into crumbs.
*Line a 9" deep dish pie plate with pastry OR buy a deep dish frozen pie dough.
*Fill with liquid and sprinkle crumbs over entire surface of liquid.
*Bake 400 degrees - 10 minutes (until crust begins to brown)
*Reduce to 325 degrees until firm.


Eating is only the second half of the fun! Creative chemistry takes place while making and baking. Yep, you're gonna enjoy this!  Happy Thanksgiving!


~"Sam"